Our slides have been scanned and digitized permitting analysis and viewing of the slides at high resolution on your computer (“Virtual Microscopy”). These webslides are delivered from a central server to your personal computer that acts as a digital microscope.
Helpful Points:
(1) Open only one slide at a time to reduce the memory and processing load on your computer.
(2) An external mouse with a scroll wheel can help with panning and zooming on the VM.
(3) A links to a video tutorial on how to use DigitalScope is available in the drop down menu above or at the bottom of this page.
Using DigitalScope to view webslides
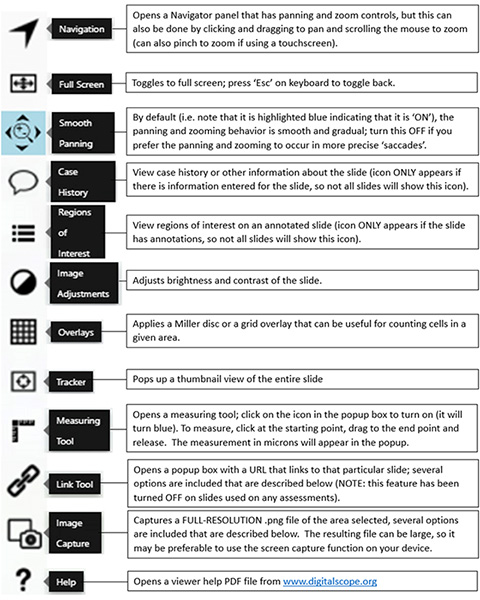
Below is a brief explanation of the toolbar shown in the DigitalScope viewer:

Link Tool options:
- Regions of interest/arrows – these options apply to annotated slides in which regions of interest can be selected on the slide or cells/structures indicated by an arrow
- Open Regions of Interest List – helpful if you have multiple regions of interest (e.g. a blood smear with multiple ROI’s outlining the various cell types)
- Open Navigation Window – this shows the navigator (zoom and pan) tool
- Open Miller Disc/Grid overlay – shows either a box with an inset or a grid overlay for cell or lesion counting
- Hide Link Tool – this shows the slide but HIDES the link tool
- Open Case History – automatically opens the case history if available
- Navigate to First ROI – takes the user to the first ROI on an annotated slide
- Navigate to Home – basically shows the “home” view with the slide sized to fit within the frame
- Navigate to Current Coordinates – takes the user to the specific area and magnification
Image Capture options:
The “Image Capture” tool will capture ALL of the pixels in a selected region in a .png file (i.e. at the resolution the slide was originally scanned, which is usually at 20x or 40x). The resulting file can be very large, so it may be preferable to use the native screen capture function on your device (e.g. ‘Win’+Shift+S on a Windows device) which will capture at screen resolution.
To use the screen capture tool,
1. Select the preset option for the area to capture:
- Freeform – a rectangular area of any size expanded by clicking and dragging
- Square
- Vertical Rectangle – ‘portrait’ orientation
- Horizontal Rectangle – ‘landscape’ orientation
2. Select whether to include regions of interest or arrows (if the slide has annotations)
3. Click on the ‘Capture’ button to activate (it will turn blue)
4. Click on the viewer to either create the area (if in ‘Freeform’ mode) or to place the preset area on the slide; preset areas can be repositioned by clicking and dragging
5. Click on the check mark to capture or the ‘X’ to cancel
Click here for a video tutorial on using the DigitalScope viewer for virtual slides.
|

